Receive Money
Add a customer payment
- In the Sales menu, select receive money
- Click “+Add Receive Money”
- Enter the name of the customer you have to receive money from. If you use multi-currency, you can enter your payment in the currency of the customer.
- If the customer is not existing in the system you can directly add the customer right from the current screen by just writing the customer name and click enter, a form will be open for an additional customer you can save it and make a further transaction.
- Select Payment mode and appropriate fields depend on the payment mode. Enter the amount of the payment.
- Click “Save and Continue Edit” to save the payment as a draft, or click “Save and Approve” to approve or click “Save and Pending” to mark the payment as pending and enter a new payment or click “Save and New” to record a new payment and save the previous one or click “Save and Close” to close the payment and save the payment in draft status.

Header Fields:
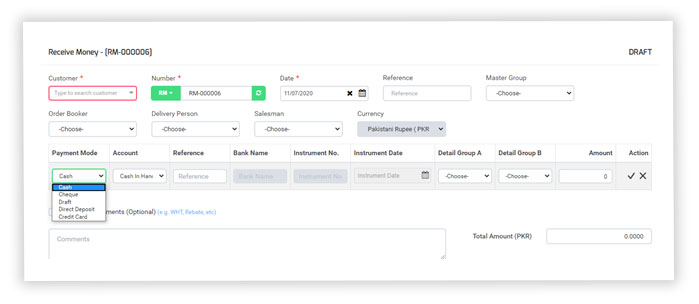
- Customer: Enter the name of the customer you would like to get money from. If you enter a name that’s not already a contact, Splendid Account adds it to your Customer list.
- Date: This is set as default to the current date. You can change this also.
- Number: Use Splendid Accounts default numbering sequence or you can add your number sequence by clicking on number code and then a “+ “sign
- Reference: Choose a reference to suit your company. Later, you may want to search for your payment using your chosen reference.
- Master Group: This field appears only if you have enabled Groups. Groups let you customize the payment in many ways.
- Currency: If you have a Business Edition plan with multi-currency, you can select a foreign currency customer that you’ve already added, you can edit the exchange rate if required. If you entered a default currency customer, it automatically displays.
- Exchange Rate: This field will display if you select a customer of such currency that is different from your company’s currency so that you have to provide an exchange rate for the particular customer.
- Order Booker: This field appears only if you have enabled. Let your customer know which order booker will go and collect the payment. You can add multiple order bookers under the Sales Person menu.
- Sales Man: This field appears only if you have enabled. This will display a list of all the salesmen you have entered into the system.
- Delivery Person: This field appears only if you have enabled. Select the delivery person of your choice for a particular customer, also you can choose based on areas.
Line Item Fields:
- Payment mode: Select the payment mode by which you have to receive the amount from your customer. Different payment modes could be selected against a single customer.
- Accounts: Must be mandatory to select your accounts against payment mode in which account you would receive payment from your customer.
- Reference: Cheque number can be mentioned as a reference.
- Bank Name: You can enter the bank name of which cheque you are receiving.
- Instrument No. and Instrument date: Entered the instrument number, instrument date for record of your account. Must be mandatory to enter the instrument number, instrument date against Cheque, Draft, and Direct Deposit
- Detail Group A: This field appears only if you have enabled Groups. Groups let you customize the payments in many ways.
- Detail Group B: This field appears only if you have enabled Groups. Groups let you customize the payments in many ways.
- Amount: Enter the amount you have to receive from your customers. He can either pay the full amount or partial amount accordingly.
Account adjustments
Splendid Accounts has an account adjustment (optional) field in receive money screen to adjust your expenses or enter the Tax repayment expenses.
Or extra expenses like Add shipping charges of your products or services that your customer has bought from you.
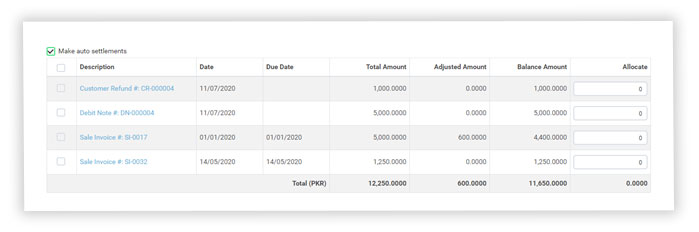
Settlements
- In Splendid Accounts, you have an option to settle your customer’s full or partial refund on an overpayment if you’ve paid it back to your customer.
- Also, you can settle your customer debit note, invoices.
- The default auto settlement of invoice and credit note has been settled against the amount entered.
- Also, you can settle your receivables manually you want to settle against payment amount entered.
Also, you have seen your adjusted amount and Balance amount in settlements.
Multiple Printing Receive Money Templates
Splendid Accounts is offering you a variety of receive money templates.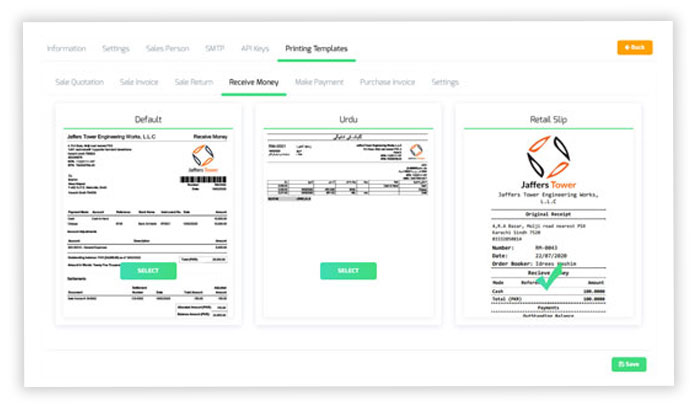
Description and narration at the advance filter
Two new filters have been added at all screens were available for the product description and narration of the document in the advance filters option.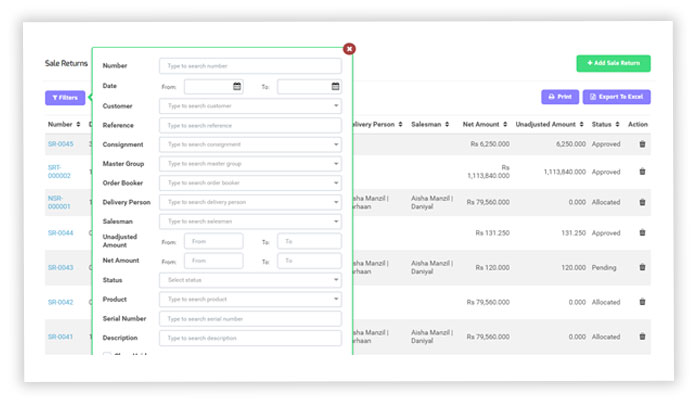
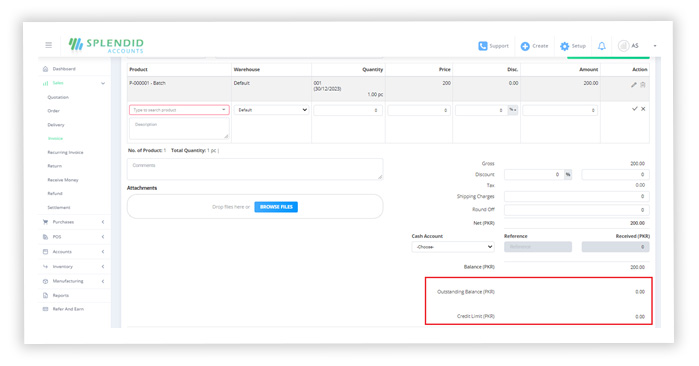
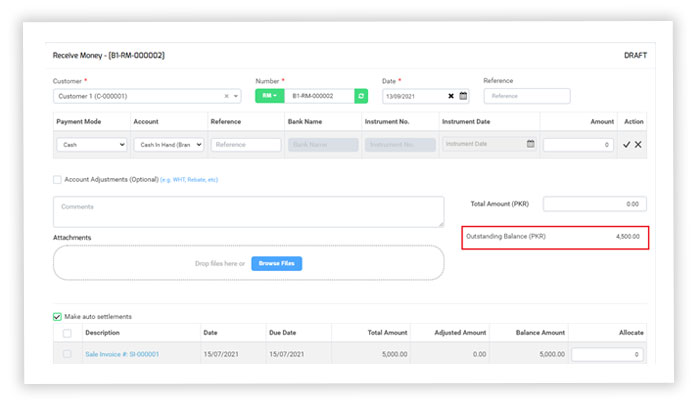
Outstanding balance will display as collectively for shared customers in branches
a-If a company has shared customers across its multiple branches, at receive money page, you can directly view the customers’ outstanding balance of all branches as it is collectively displaying.
b- Also, in the case of shared customers for different branches, branch filter is not available in the following reports
• Customer Ledger
• Customer Balance
• Aged account receivable report
Credit Limit and Outstanding balance
System displays credit limit amount of customer below outstanding balance of that customer.